 Did you happen to see what I used for plates at last week’s pop up dinner? Yup cedar grilling planks. I had 8 piled up on my dining room table begging for use, and while I’m a huge fan of cedar plank grilled salmon, I couldn’t see myself eating it for 8 meals in the next few weeks. So instead I created a DIY – cutting them up and turning them into coasters.
  While it requires a little more hands on DIYing and possible pending blisters from a whole lot of wood sawing (I had to take breaks to avoid that catastrophe) the basics of this DIY are pretty simple and sweet! Plus mega bonus: since it’s the end of summer (boo) you can find cedar grilling planks on mega sale (yay!). I got mine for a steal at 50% off. Sales make me happy!
Okay so ready to get on with it then?
 Tip: My painters tape is horrible and I had to switch to washi tape which worked like a dream.
You will also need very very strong double sided tape or very very strong glue.

 1 Using a pencil and ruler, measure and mark your cedar planks, then use a saw to cut into even squares. Each plank is a little different so measure accordingly, but mine was first cut into two halves at 3.2cm each, then each half cut into quarters by 3cm. Once they’re all cut, use sandpaper (or a sanding block like mine) to sand down the entire surface, especially the cut edges, until completely smooth.
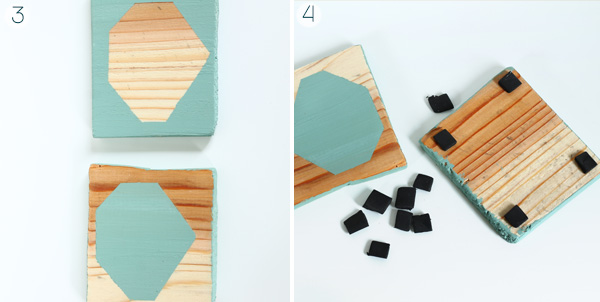
 2 Cover the entire surface with tape, then use your ruler and pencil to draw a geometric shape. I chose a triangle, hexagon, and this wacky septagon shown above. Carefully cut along the lines with an exacto knife using a sturdy ruler (metal is best) to guide you. Carefully peel off the shape then stick it on another wooden square.
 3 Apply a coat of acrylic paint to the exposed areas and edges, just enough to cover the wood grain. Once dry, apply a thin coat of varathane (or some other wood sealant) and allow to dry.
4 Cut your foam sheet into small 1cm squares. Place double sided tape or glue on one end and attach to each corner on the bottom of each coaster. This step isn’t fully necessary but it helps prevent slipping.
 5 Stick a glass on that sucker and enjoy!
I just love how the painted colours look against the wood, especially the naturally ombre wood pattern! It doesn’t get better than that am I right? And you don’t have to make negative space and shape sets like these. You could just have 6 completely different shapes to really mix things up. They’ll look great on your coffee table or tied up with twine as a sweet house warming gift!
I’m boring and that’s my favourite drink.
What drink would be on your coaster?


This is a lovely diy! Love the gold and silver!
Im goona go check out your other stuff!
Thanks Jenny! Oh I’m glad you liked that one! It wasn’t as gold as I wanted so it’s actually my least fave, but it still works!
Cute! That fruity drink looks tasty too!
Shhhh…it’s just sparkling water with fruit
Love, love, love! Can’t go wrong with gold and glitter.
Exactly right?
great, just wait my moment to do it possible!
Let me know if you make them! I would love to see.
these are so great! simple yet sparkly & fun! love them!