Before we go on to the actual post, in case you’re wondering then why yes! The site does look a little different! I’ve changed the font (I was never happy with the original) and a few other typography bits and pieces. You can expect to see some more tweaks over the week 🙂

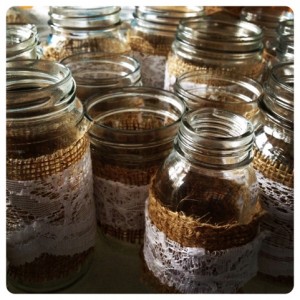
I saw a picture of these darling jars a while back on pinterest and knew they would be a perfect fit for our wedding. The great thing about this project is you can make several jars for a very reasonable price.
Lace: I scoured thrift stores and found lace curtains for $8. SO much fabric for so cheap!
Burlap: I lucked out. From his tree nursery days, my dad had a whole bunch of burlap lying around and gave it to me to make the banner for our engagement photos. There was plenty left over for the jars (and there still is plenty left for future projects).
Jars: I used old canning jars of mine and even washed out peanut butter and sauce jars, all of different heights and sizes for a unique look.
With the help of one of my dear bridesmaids, we made 18 of these lovely burlap & lace jars to use as part of the centerpieces for our wedding to use as vases for either flowers or candles.
My total cost of the project: $8.
That’s a win.
After posting the above picture on facebook I had requests for a DIY of these adorable little jars. Here’s a little tutorial for your crafty little hands to get a hold of. Enjoy this easy and fun project!
Burlap & Lace Jars DIY
Materials
Steps
Step #1: Warning, I’m lazy when it comes to measuring and do everything by eye (bad Tanya). Line up your burlap to your jar, leaving about a 1/2 inch space on the top and bottom and cut into the burlap. Cut the length of the jar circumference.
Step #2: Cut lace the same length as the burlap and approximately a 1/2 inch narrower.
 Step #3: Squeeze out a couple lines of hot glue directly onto the jar the width of the burlap. Firmly press the burlap down, but be careful not to burn yourself as burlap has holes and the glue is very hot! Repeat this step every inch until the two ends meet. Make sure you line up the two ends of burlap.
Step #4: Repeat step #4 with the lace, making sure the ends of the lace line up with the seam of the burlap so they both start and end at the same place.
 Step #5: Cut off any straggly bits of burlap for a clean finish.
And voila! There you have your beautiful burlap & lace jar!

What part of your home will you decorate with these dolled up jars?


Lové this!!! So cute! Amazing idea to use thrift store lace curtains 🙂
So pretty! What a great idea. Can’t wait to see what you fill them with for your wedding!
such a cute idea!
Well done! Such a sweet idea and I love the combo of burlap and lace.
these look great! such a great mix of textures going on.
@Katie: I hummed and hawed about getting the lace curtains (I got them before this project actually) and I’m so glad I did!
@Stephanie: We’re meeting with our florist today for the first time. Yay!
@Punctuation Mark, Janis, and Heather: Thank you!