Invitations: CHECK!
You have no idea how exciting it is to be done!
Don’t get me wrong, invitations were beyond fun and so far my favourite part of the whole wedding planning process. But it was a lot of work.
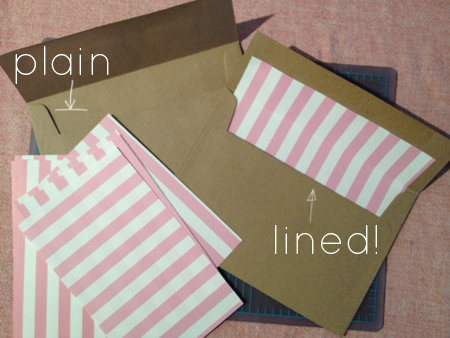
We designed the invitations (revising proof after proof), designed our custom made stamps, assembled the packet (cutting, stamping, pasting, and tag punching alongside my AMAZING friends) and even lined the envelopes, because plain envelopes just aren’t good enough.
We purchased three different coloured envelopes – pink, green and kraft paper. While they were gorgeous on their own they lacked a little something. Instead of just leaving them I went out, bought cute scrapbook paper in our colours and got to work. Additional cost for the paper? $5 (on wicked sale).
It’s cheaper than buying pre-lined envelopes, and this way you can completely customize it with your wedding colours.
As Ryan put it, “it’s unnecessary, but adds a nice touch”.

Here’s what you need to make your own, whether it’s for a wedding, birthday, or just for the fun of it.

Materials
– 5×7 Envelopes
– Scrapbook paper
– Paper cutter
– Photo mount squares
May be optional:
– Metal ruler
– Exacto knife pen
– Cutting Mat
Steps

Step #1: With a pencil, mark your scrapbook paper to squares of 16.5cm x 10cm. Use a paper cutter to cut your pieces. If you have a crappy blade like mine that leaves frayed edges, this is where your metal ruler, exacto knife, and cutting mat comes into play. Align the ruler just underneath the frayed edge and cut it off with your exacto knife. You could be smart and get a better blade for your paper cutter, or just be like me and make more work for yourself. (p.s. not advisable)
Step #2: Place photo mount squares on the back of your cut paper, two on the bottom and three across the top, with the removable tabs facing downwards (makes it easier to remove). Take the protective backing off the bottom two.
Step #3: Insert the lining into the envelope, making sure not to press down on the exposed photo mount squares just yet. Once it is aligned with even space on sides and top, press down on the bottom squares. Remove the backing on the top three squares then press lining flat on the envelope to stick.
Step #4: Fold the envelope flap down at it’s natural fold, making sure to press crisply by running your fingernail across. This will give the lining inside a nice crisp fold.
Step #5: Open and revel in the new found beauty of your personalized envelope!

That’s it!
Now, I’m not showing the finished product until after the wedding (no fun ruining surprises) but here is a glimpse I posted on Instagram.


Wow, that is a lot of work! But the end result is so pretty! Can’t wait to see the finished product…
What a great idea.
@Stephanie: it was but oh so worth it!
@Heather: Thanks! And thank you for visiting!